By Rusty Marlin
How the Action Normally Works: The Problem The "Marlin
Jam" as it is affectionately known is caused by an inherent design/manufacturing
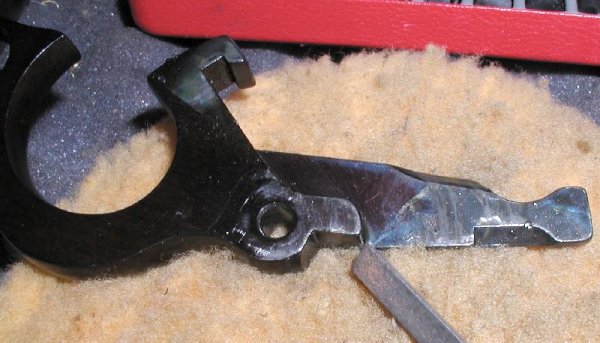
flaw of the Marlin lever. The lever has a snail shaped cam surface that
goes around the pivot screw. Every time the lever is cycled the carrier bounces
on the forward edge of the cam. The forward most edge of this cam is left
sharp at the factory (the flaw). After many thousands of cycles, the sharp edge cuts into the carrier enought so
that the timing is slightly changed. At first, you will feel a slight "hitch"
when cycling, then the timing will get worse; the carrier nose gets lower in
relation to the magazine tube opening so that two shells are allowed to exit
the magazine. The first shell comes in on top of the carrier as normal, and
the second shell slips past the carrier nose and gets trapped between the top
of the carrier and the magazine opening in the frame. Marlin calls this "letting in two" because rather than letting in one cartridge
at a time, the carrier allows two to slip by.
As the lever is cycled, it slightly lifts the cartridge carrier which allows
one shell to come onto the carrier. And the carrier blocks the other shells so
they stay in the magazine tube.

See the cam After the sharp edge was removed.
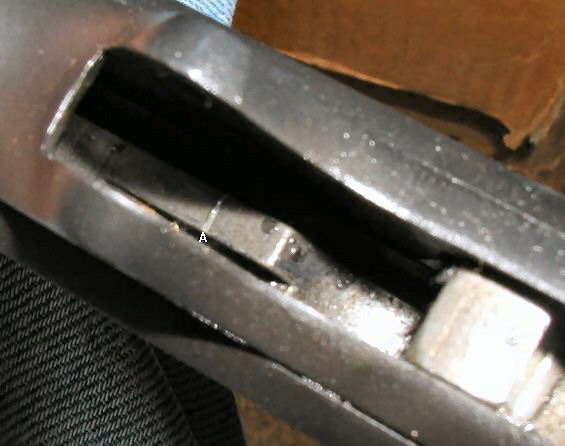
The bouncing forges a notch into the bottom of the carriers' slide surface and over time (high number of cycles) lowers the carriers' initial pick-up height allowing the rim of the next incoming shell to slip over the front and jam it up tight. Note the notch labeled A in the photo.

Simply changing the carrier out as many repair places do is only a temporary fix at best. The new carrier will get a notch forged into it from the sharp edge of the lever cam and over time will settle downward in the action and again give you the “Marlin Jam”. Following the steps below will cure this problem FOREVER.
The Cure for New Guns
For Coyote Caps Alternate solution
With new guns (less than 50 cycles) you can generally get away with just putting
a radius on the forward edge of the lever cam. While this will lower the
initial pick-up height slightly, it typically will still be high
enough to prevent the dreaded "Marlin Jam" from ever occurring. If your
rifle jams you will need to follow the steps outlined above. Many of you will have guns that jam once and a while but haven't figured out
why. You probably have an odd piece of brass or two in your collection. For
example the gun might run fine on Starline or Winchester but lock up tight on
R-P. R-Ps are slightly smaller than others and this will cause the problem to
be sporadic. Eventually the gun will jam on anything you feed it and you will
need this fix.
The Fix for Used Guns
Note: This is a good solution to general timing problems
Three things
are required to fix the problem. The first two prevent it from ever occurring
again and the third retimes the carrier to proper height. Don’t even bother
to do them if you aren’t going to do item 2A or item 3. Use the heat and bend method described below. Clamp the carrier in a large bench vice so the pivot hole axis runs vertically.
The
two parallel faces at the pivot hole end need to be clamped in aluminum
blocks for a heat sink. If the heat gets to the plunger spring you will
need a new carrier, so the heat sinks are very important. Heat the neck just behind the front of the carrier till dull red. Position a
block
of steel (or brass) just behind the shell stop (tang that hangs down in
front) and tap the head "up". This is actually going to be parallel to
the floor. Measuring this movement can be difficult. I gave up trying after the first few
and
now it’s by eye. After cooling try it in the gun. If you went too far the
very first incoming shell will jam as the lever is opened; the carrier
will wedge it up against the top of the magazine opening. You will need
to heat the carrier again and tap it back a touch.
These two
items will make the problem worse until item three is done.
This retimes the carriers' initial pick up height to let one round in and keep
the rest
in the magazine.
Rusty Marlin, SASS #33284
Coyote Cap's Cure Why Marlin has not cured this problem, long ago, amazes me.
"CAP"
But I don't have a welder!!!??
Some folks have used other pieces of metal. They normally grind down the
carrier to fit in another piece of hard metal. Some used JB Weld or a similar
adhesive to attached hacksaw blades, others used two jig saw blades (with the
teeth filed off). Here's what Butcher John Remington did:
I went one better. I cut 2 strips of jig saw blade. (very hard steel) 1/2 " by
about 1/8 " wide and removed the teeth. JB Welded them onto the bottom bottom
plate where the carrier hit to keep the carrier up a little. Probably 6,000
rounds through it now and there is barely a mark on the pieces or steel and the
problem never happened again.

Back Home
![]()