Disclaimer: I am not a professional gunsmith, just a shooting enthusiast and hobbyist, as well as a tinkerer. If you are unsure about any of the following procedures, please defer to a qualified gunsmith. Please thoroughly read, and fully understand these instructions before proceeding. Wherever possible I used the names for parts as found in the owner’s manual. For polishing I use wet/dry 400, then 600 grit emery paper wetted with Hoppe’s gun oil. To remove metal I use a jeweler’s file, then polish as above. For stoning I use a hard Arkansas stone. To polish pivot pins I use oiled 600 grit emery paper, or oiled automotive crocus cloth. Work slowly and carefully and check functioning frequently. It’s always easy to remove a little more metal, but adding metal is very difficult. This procedure requires special tools, and only works when using those tools.
Warning: Disassembling and tinkering with your firearm may void the warranty. I claim no responsibility for use or misuse of these instructions; proceed at your own risk!
Working the Sear
Caution: This procedure requires special tools. Unless you are familiar with working with hammers and sears, please do not attempt these procedures.
Currently in my collection I have two Marlin lever-action rifles; a model 1895 CB in .45/70 caliber, and a model 1894 Cowboy Limited in .45LC. Each of the sears were just rough cut as they came from the factory. In fact, the sear for the 1894 CB Ltd. wasn’t even square. The following procedure will square and polish the sear, making the trigger pull lighter and crisper.
Required Tools
Please do not attempt to cut/polish the sear without the correct tools. Without the correct tools you could round the surfaces making them unsafe and/or inoperable. I used the following tools to work the sears on my Marlins.
| Tool: | Available From: |
| Marvel 1911 Auto Sear/Hammer Jig
Used to cut/polish sear | |
| Coarse ceramic stick Used to coarse-polish sear | |
| Fine ceramic stick Used to final-polish sear | |
| India Stone Used to cut sear engagement surface | |
| Hard Arkansas Stone Used to polish sear engagement surface |
Procedure
1. MAKE SURE YOUR RIFLE IS UNLOADED AND THAT THERE ARE NO CARTRIDGES IN THE CHAMBER OR MAGAZINE.
2. Disassemble the rifle.
3. Remove the trigger and sear from the trigger guard plate.
4. Install the Marlin sear onto the sear jig insert with the sear-to-hammer engagement surface up and parallel with the top edge, convex curve to the left.
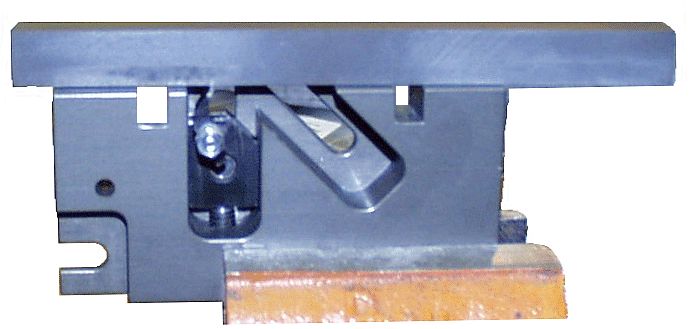
5. Insert the sear jig insert into slot B of the jig so that the sear surface is below the top of the jig.
6. Mount the jig in a vise so that you can access the height adjusting screw, and the sear jig insert locking screw.
7. Place a ceramic stick or other flat object on top of the jig.
8. Loosen the sear lock nut just enough so that the sear can rotate.
9. Using a feeler gauge, rotate the sear until the back of the sear is 0.045" (45 thousands) away from the jig wall.
10. Adjust the height adjusting screw to check that the sear engagement surface is perfectly flat against the flat object. Rotate the sear until the engagement surface is perfectly flat and parallel with the top of the jig.
11. Tighten the sear lock nut making sure the sear does not rotate.
12. If the engagement surface is square, i.e. the entire surface touches the flat object, go to step 15.
13. If the engagement surface is not square, cut it with the India stone. Adjust the height adjustment screw and cut the surface until it is perfectly flat and square with the top of the jig.
14. Polish with the hard Arkansas stone.
15. Polish the engagement surface with the coarse ceramic stick until it is shiny and flat. Keep the polishing surface wet with water. Ceramic sticks use water as the cutting agent.
16. Final polish the surface with the fine ceramic stick. Again, use water as the cutting agent.
17. Dry the sear and apply a light coating of good quality gun oil.
18. Reassemble your rifle. The trigger should now be a bit lighter, but very crisp.
19. If the trigger is not light enough for you, you may now adjust the trigger return spring tension.
Final Note
I’ve fired maybe 300 rounds through my 1895CB before taking it apart to obtain the photo for this procedure. I examined the sear engagement surface and found it to be solid black. This indicates that the entire surface was engaging the hammer, i.e. the sear engagement surface was flat and square to the hammer engagement surface, which is as it should be.