(Remington Spartan or SPR)
Additional notes in italics by Rusty Marlin
For additional info on tuning the Baikel Bounty Hunter II, be SURE to take a
look at
Editorial note: This is information only about what a few cowboys found worked
for them. If you do not feel comfortable working on your gun and assuming
liability, please go to a good gunsmith and let them tune your gun. The first thing you need to do is remove the barrels,
stocks, and trigger guard. Take off the butt pad. There is a hole in the
rear of the stock and a screw at the bottom of that hole. This screw holds
the stock in place. Remove it and pull the stock free from the receiver. To remove the trigger guard, remove the screw that holds the stock mount
in place. This is at the rear of the receiver assembly and it is the part
that the long stock screw was attached to. Rotate the trigger guard counter
clockwise until it comes off. Next remove the screw at the bottom of the receiver that holds the bottom
plate in place. This can be tight, so use a well fitting screwdriver. Put the barrels back on the receiver for leverage and so the receiver stands
upright. Use an impact driver (impact tool with screw-driver blade) to loosen
the screw. Lift the bottom plate loose from the receiver. You may have to gently pry this
part away from the receiver. Use an M6x1 or 5 mm screw as a jackscrew through the
trigger guard screw hole and the plate comes up very easily without fear of
bending it or scratching anything. (Before re-assembly, polish the sides of the
screws so they are easier to install and remove.) There is a pin that passes through the sears from one side of the receiver
to the other. Tap this out with a punch and hammer. Remove the sears and
the two sear springs. There is another pin that holds in the hammers in the same fashion. This
needs to be removed so the hammers can be taken out. On the front of the receiver, there are two cams that do the cocking when
you open the action. These are held in place by another cross pin. Remove
this pin and the cams. After this is done, you can remove the hammer spring assemblies by pulling
them out through the holes in the front of the receiver. To change the springs, you will need to compress them while you tap out
the pin that holds the cap onto the end of the spring shaft. Wrap a rag around
them so they don't go flying. I sacrificed a kitchen fork to use as a tool
to compress the springs. (don't tell my wife) One recommended method to make sure the barrels stay open for loading is to
get some modified cocking levers. Contact Papa Dave for cocking levers. He sends you
the cocking levers and instructions. If they work for you, you pay him. A
great deal for
most of us. With his modification, you probably won't need to change the
cocking springs. He is also working on swapping out other parts with you for
the
rare case that more than just cocking levers are required. Or you can refer to Mohave Gambler's web
site listed at the top to see how he ground them down. This keeps the strong
springs but allows the gun to open.
To change the release lever spring, remove the lever by tapping the pin
out that holds the little block inside the receiver that the lever actuates.
I used a hammer spring (main spring) from a 1911 semi auto that was cut to
the same length as the Baikal spring. Smooth the cut end with a file.Getting this apart was easy; putting it back together was a struggle!! Be
patient, it came out of there so it must go back in. While the gun is apart, you should take the opportunity to sand and polish
all internal parts until they all move freely. If you skip this step, you
could have parts that stick because of the lighter springs. I used 600 grit
emory cloth and oil. It does a nice job and doesn't remove much metal. After all this is done, you won't believe the difference in the gun. It
will open easily, stay open for faster reloads, and have a lighter trigger
pull. Take your time and try not to get frustrated. It took me several times
disassembling and reassembling my gun to get it the way I wanted it. What
I have listed here is the result of this. Let me know if there is anything
else I can do. I had no problem driving the pins out for the cocking
cams, triggers and sears. Observe closely, the way they came apart, mark
them if you have to. When I was reassembling, I had to refer to the manual
that came with it a couple of times. I had the barrel upside down that the
stock retaining screw goes into and couldn't get the stock to go on all the
way. I used 600 grit emory cloth and oil and slicked up the
sides of the hammers, sears, triggers and the cam that the release lever
uses to move the locks. I cleaned and inspected as I went. The 1911 hammer
spring worked neat. What I did was take the pin from the cam and just took
the stock spring out and cut the same length of the 1911 spring. I have enough
spring left over to do about two more levers. There is no need to remove
the lever or anything. The cocking springs are the reason the foul thing wouldn't
open far enough. You can hold them in a vice and either vice grip or use
a fork to compress the springs. The pin pushes out with a nail. I didn't
even have to drive it. When you get the Colt 1911 hammer springs, cut them 1/4
inch
longer than the Baikal springs to start out. (see notes above on hammer springs) I then took needle nose pliers and bent the end coil
to the next one and closed the diameter a bit to keep it close to the shaft
at the hammer end and filed it flat. (It is important to file the cut end of the spring flat, so the spring can
stand up on a table or flat surface.) I found that the new springs are
easier to put together and pin the caps. I used a kitchen fork and no problem.
I got a little excited when I put the setup in the bore, it felt like it
was going to be to big. Not so, once I got it seated it was fine. Make sure
you have left and right in the proper side. I went ahead and polished the
receiver at the cocking spring where the barrel hinges, I don't know if I
needed to, but it was rough, so I went ahead and did it. Now for my barrels, I removed the screw that retains
the extractor and found that I could not even pull it out with my fingers.
I inspected it and found the guide pin bent and I straightened it, but it
was still seriously tight. I emoryed the pins a lot until I could slide the
extractor in and out with ease. I also polished up the sharp edges on the
extractor, not wanting to cut myself in the heat of battle, trying to reload
quickly. I didn't polish the chambers, as shells didn't stick in my SXS before
and I figured I could always do it later. Once I had the receiver all back together and figured
out why the stock wouldn't slip all the way on. I sanded the stock on the
top to give the lever plenty of room and on the sides coming from the receiver
to just smooth it up a bit. I then sanded the whole thing and wiped on some
Watco special walnut stain I had around and it looks great. I put the screw
back in the stock, careful to make it not too tight and the end piece. Then to try it. What a dream opened easily, fell open
all the way with plenty of clearance for reloading and locked up tight. Smooth,
feels like a Browning. Took it out back and shot a few. SOLD, it is a great
gun, Russian commies or not and every bit as nice as I could hope for. Now
if you decide to tackle it, I will be able to help you, so long as my memory
holds out. Regards, Calaveras Some more hints from the SASS Wire and others: 1. When you cut the springs, make sure that the end
you cut is flat like it was before you cut it. You should be able to stand
the cut spring up on a flat surface without it falling over. If you just
cut the spring and didn't grind or sand the end flat, it will be pushed to
one side when you compress it, causing it to rub against the hole that it
rides in. When you replace factory springs with lighter tension springs, it's necessary
to make sure everything in the action moves as freely
as it can. Any friction will take power away from the firing pin strike,
causing inconsistent primer ignition.... no good! They put heavy springs
in these guns so they'll fire all the time without having to put proper
clearances
in the parts. It's cheaper. These are great guns. I love mine. But they need
some work to make them that way. Keep at it , Pappy. You'll get it right.
And when you do, it'll put a big smile on your face. Return to Shotguns Page Return to Irons Page Back to the Cowboy Page Editor's note: A lessor recommended alternative is to use the hammer spring
from a 1911
Colt 45 Auto pistol. Try a 25 pound spring or if needed go up to a 28 pound
spring. This will also reduce the amount of smoothing needed. Cut to 1/4 inch
longer than the stock Baikal springs. (Make sure
you file it flat like the original.)
They may look a little wobbly, but
stuff them into the cleaned out/polished bores. Do not reduce the springs too
much because they cushion the gun when you open the action. Relatively
stronger springs will protect the lug and gun from breaking due to the rough
action we give our guns when unloading and loading. Generally, it's best to do
the cocking levers first to see if you want to do the springs.
It may take hours (literally) to polish the bores so the springs slide smoothly
enough so you won't have miss-fires. Use a piece of Ľ” dowel, or brass rod
with a slot sawn lengthwise for an inch or so to hold the emery cloth. Chuck
it in a hand drill and have at it. Start with 220 grit and remove ALL the
radial drill marks. Finish polish with 320 and then 400 grit; don't worry
about the broach marks that run the length of the spring bores.
Now here are some things I ran into. First, the stock retaining
screw was seriously tight. It's slotted, so I found a long shanked screwdriver
that fit that had a hex at the top of the shank (snap on) I put the stock
in a vice padded well and pushed hard while turning the wrench. It broke
loose. I believe the wood had swelled and had that screw at about 100 lbs
of torque. If this hadn't worked I was prepared to rig up a hand impact
driver that I could hit with a hammer.
For you reloaders out there here is my recipe, its published, AA hull, WIN 209
primer, 7/8 oz Claybuster wad or Winchester Grey and 17.1 grains of Red Dot.
This is a minimum International Skeet load. My Wife's shells are even lighter.
All the components are the same but use only 14.3 grains of Red Dot (or 14.8
grains of Clays). This load
will break birds from the 16yrd line, and flatten the knockdowns.
Note: Although some folks use libricant, some knowlegeable folks recommend against it
- espeially if you are using regular loads.
known as Howdy Doody
2. You can polish the inside of the hole that the spring assembly rides
in. This may be done by wrapping some emory cloth and sand paper around a
rod with a slot on the end and spinning it with a drill motor. This will
smooth out the hole.
3. Make sure that the hammers move freely through their range of motion.
Take them out and sand and polish them if you have to.
4. See if the firing pins are rubbing on the edge of the holes that they
poke out through when you pull the trigger. I had to file the firing pin
on one hammer of my gun when I did the action job. Don't drill the hole bigger.
It's better to file the pin if you need to.
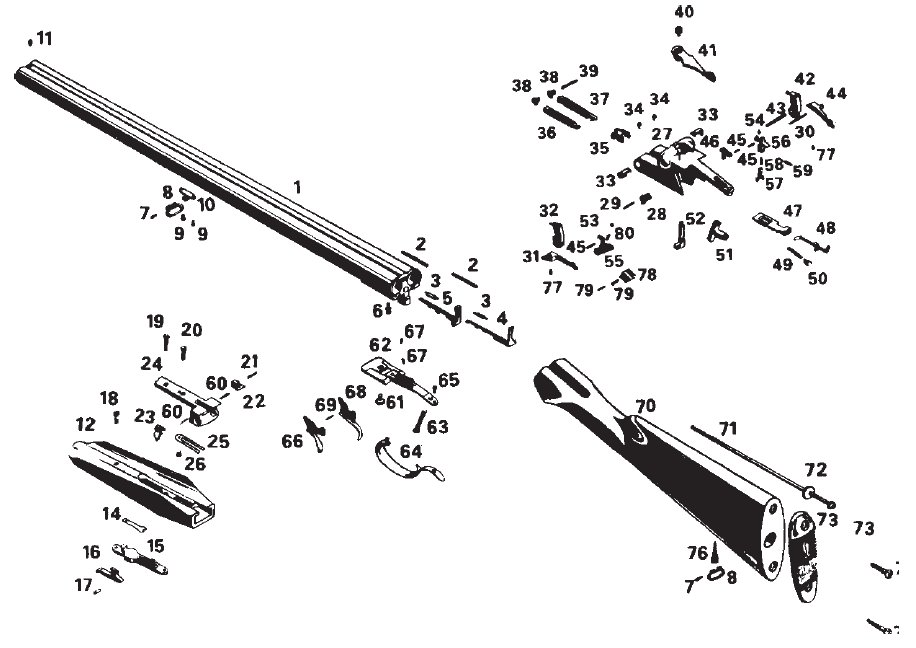
For a larger graphic - Click Here
1. barrel assembly 29. cam pin 55. safety 2. extractor spring 30. sear pin 56. sear lifter lever 3. plunger 31. left sear 57. sear lifter 4. right extractor 32. left hammer assembly 58. sear lifter spring 5. left extractor 33. plug 59. sear lifter level pin 6. screw 34. plug screw 60. pin 7. pin 35. follower 61. screw 8. sling swivel ring 36. left rod assembly 62. trigger plate 9. screw 37. right rod assembly 63. screw 10. barrel sling swivel base 38. cocking lever 64. trigger guard 11. front sight 39. cocking lever pin 65. trigger guard screw 12. forend 40. screw 66. right trigger 13. washer 41. locking lever 67. trigger spring 14. spring 42. right hammer assembly 68. left trigger 15. latch body 43. hammer pin 69. pin 16. forend latch 44. right sear 70. stock 17. pin 45. pin for safety and 71. screw 18. screw thumb piece 72. washer 19. screw 46. thumb piece 73. butt plate 20. screw 47. locking bolt 74. woodscrew 21. lever pin 48. connecting rod 75. woodscrew 22. left lever 49. locking bolt spring 76. stock sling swivel base 23. right lever 50. cam stop 77. sear spring 24. hinge 51. threaded connecting 78. wright 25. lever spring piece 79. pin 26. screw 52. locking bolt lever 80. safety spring 27. receiver 53. ball 81. bushing 28. cam 54. sear lifter lever spring