Marlin Extractor Modifications
By Widowmaker Hill SASS #59054Marauder's Notes:
Widowmaker Hill has given us some very good information to help improve the reliability as well as the speed of the Marlin 94 rifles. But . .WARNING: This information contains significant modifications to the extractor.
The work is generally not reversible without replacing parts. So you may want to give this information to your gunsmith unless you are pretty handy and don't mind a little risk.
- - - Now we return you to Widder's instructions. . .
- - - - You can find more great info on the Marlin by knowledgeable Pards can be
found on Marauders website:
http://marauder.homestead.com/rifles.html. There you will find parts diagrams as well as take-down instructions.
NOTEWORTHY: All of this information has been put together for those Marlin owners who are working with the angle feeding modification BUT, after an exchange of PM's with Howdy Doody, we feel that this setup 'could/might' also help Marlin owners whether they have the angle feed mod or not.
FLOWERS: AJ, Howdy Doody, Curly Bill Kelly, Lassiter, Longhunter, and Marauder w/his website.
I ain't saying that all these folks endorse this setup but I've been lucky enough to gather tidbits of info from each and their wealth of knowledge has help in putting this info together.
Pards, when setting up the first couple angle feed Marlins, I encountered no issues with extractions/ejections.
BUT, since then, I have talked with more than a few Pards who have had issues with a very stiff Extractor tension hindering a smooth feeding process PLUS an occasional empty case not ejecting well and falling back down in the chamber.
And, three of the last four Marlins I have setup encountered these same situations which has enabled me to check it out and try to find a reasonable remedy.
So here are my unscientific results. I have since set up my original Marlins as described in this post and the feeding, extractions and ejections are more positive than before, especially with empty brass.
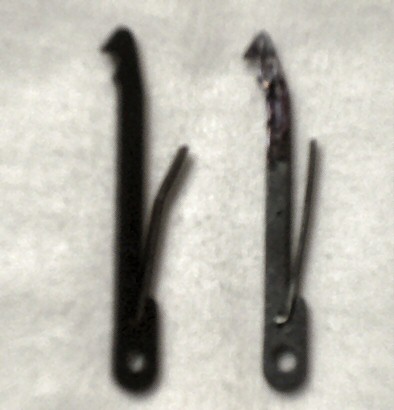 Photo #1: Left extractor is factory. Note the spring position.
Right extractor has been modified by slightly bending the upper portion of the extractor body inward. Plus, notice how the spring has been straightened for
less tension.
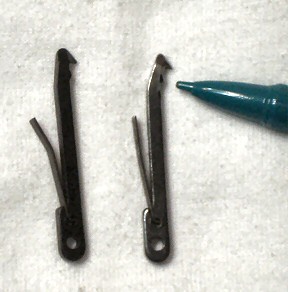 Photo #2: Lower view of both Extractors. Left extractor is factory. Right extractor is modified. Its hard to tell in the pix, but the sharp edge on the right extractor has been relieved and smoothed at the area being pointed to. This helps eliminate 'rim grab' when the cartridge rim starts to move under the extractor if you have the angle feed setup.
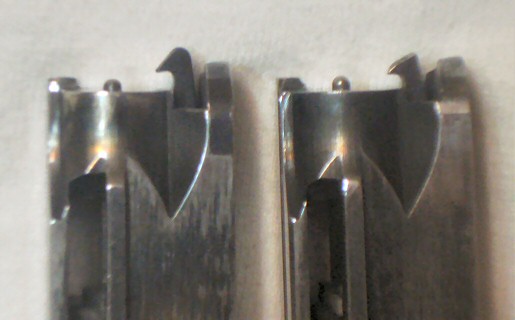 Photo #3: On the left is a factory Extractor sitting in its normal position in the bolt.
On the right is a modified Extractor sitting in its position in the bolt.
Its hard to tell much difference but if you look at the protruding firing pins, you can detect that the factory (left) is higher than the modified (right) extractor. In my limited testing (setting up 6 Marlins), it appears that the factory extractor allows tooooooo much wiggle room of the case rim and pushes against it much to hard.
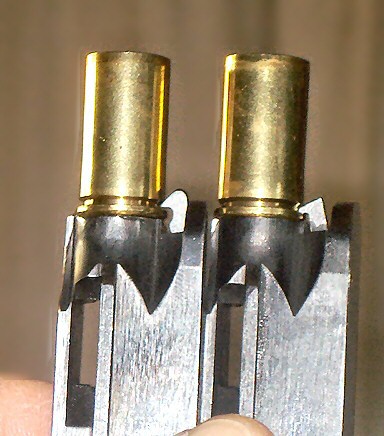 Photo #4 (left) & 5 (below): Good pix of how the extractor contacts the rim. On the left is a factory Extractor. On the right is a modified Extractor. In the left pictures, please note how much the factory extractor is being pushed back. This means that the spring tension is pushing dern hard against this rim area. But the right picture shows how the modified extractor sits on the rim without pushing hard against it. VERY LITTLE tension is being used on the case rim. In reality, the extractor is just helping to secure the rim to the bolt face.
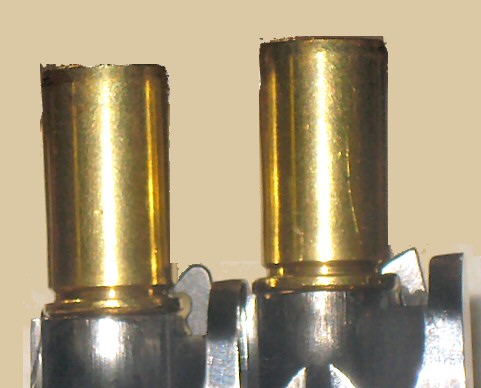
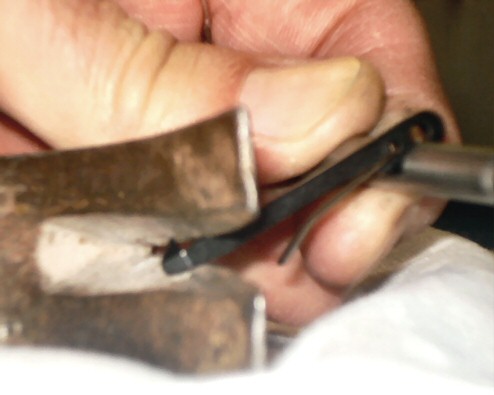 Photo #6: Aaaahhhh, here's my favorite. I call it the Poor Mans Extractor Bending Machine.
Its a picture of a hammer. Upper portion of the extractor neck area has been positioned in the claws with the body of the extractor on the other side. The 'hook' on the extractor is facing UP. With a little bar to help grasp the extractor body, I slightly start bending that 'neck' area to allow the hook to sit just a tad closer to the case rim when the rim is sitting on the bolt face.
I call this the Poor Mans Extractor Bending Machine because you don't need a welder or vise to perform this operation. All this info about setting up the Marlins to have an angle feed is something most good tinkerers and gunsmiths can do without purchasing stuff, etc......unless something breaks. YIKES!
O.K., so here's the deal:
First: weaken the extractor spring as needed. The little 'hump' beneath the extractor hook should just 'kiss' the hole that it sits down in and you should be able to move the extractor with finger pressure without it feeling heavy or hard.
Second: the extractor needs to be polished on its lower side edge where it comes in contact with the case rim as the rim is sliding under it. That extractor will slightly move when a case is feeding under it and these two little items help give a smooth process.
Third: After completing #1 and 2 above, the hook needs to be slightly bent inward to a position where its 'nearling touching' the recess in the rim. If you manage to go toooo far in your bending efforts, if its only slight, you can take a file and relieve the lower hook edge to give you a couple .0000 room for your rim to position itself under the hook.
Fourth: Once the hook has been bent inward to lower it a little closer to the rim and 'ALMOST' touching it, some of the tip on the hook can be relieved. The amount of relief on the tip edge of the hook is determined by how much of the point is pushing on the case. IN MY OPINION, the extractor should only serve a couple purposes:
A - to 'assist' in holding the case onto the bolt face
B - to extract the case from the chamber.
I personally don't like an extractor to push against the case. That is where some folks are having feeding and chambering glitches because their extractors are pushing the case rims off to the side with 'too much force' while the bolt is trying to push it in the chamber.
This process will allow the cartridge to ride up on the bolt face and slide under the extractor. With what little tension the extractor has, the case rim will basically nudge the extractor just a tiny-weenie bit as it secures itself on the bolt face.
If a Pard wants goooood feeding with a cartridge with little or no sensitivity of chambering a round, then they must allow the bolt to freely feed the round into the chamber without the extractor adding pressure to the situation.
The reason that the extractor needs to sit close to the rim is because if it doesn't, empties are likely to be extracted and fall back down on the carrier.
Now here's another freebie:
Now that the extractor tension and position of the hook on the case has been more appropriately established, the closing of the bolt in its last .0000 of travel will diminish somewhat because the extractor won't have to be 'pushed' out of the way to close the bolt completely.
On one of my Marlins, I have relieved some of the area where the extractor sits when the bolt is closed and my extractor never actually leaves my case rim. I really like the results.
I've been getting a good pickup during the chambering process, a solid extraction and REAL GOOD ejections from this type of setup.
Another BIG plus on this setup is that the Ejector doesn't have to be full strength either. Because cases are held much more securely at the bolt face with little wiggle room, I get good and fast ejection of my empties. Most of them eject about 2-3 feet.
I truly hope some of this info helps but in my experience with the Marlin rifles, some things don't always work the same in each situation. So ifn ya got questions, fire em back at me.
..........Widder (whew, tired)
Note from Hoody Doody!
As you have observed Widder, the extractors are never the same installed in the bolts. Just like two bolts are not the same either. The bolts are fitted at the factory and for the extractors either the hole in them is not drilled exactly or the hole in the bolt is not. It would be best to check each rifle seperately. The one in my Widdermaker needed a little bending and in my non Widder, it doesn't need a thing done to it other than the things I had done that Rusty Marlin gave us info on many years ago. I.E. polishing the beak of the thing and taking a tiny amount off the tip of it.
I could not miss the look of Widders extractor. That is a whole 'nuther thing right there. I have always thought the extractors could be beefed up, Someday someone will come up with something along the line of double the thickness and maybe even shaped in a crescent to sort of wrap around the case head to pull it back, but it might also hold it tighter to the bolt which is what you want for better chambering. You would have to increase the size of the hole it sits in, but the retaining pin should not have to be changed.
Note from Adirondack Jack
To me, positive extraction is paramount, so I am reluctant to reduce the point
of the extractor unless somehow I am putting the sharp point back. Widder's method of reducing the "head of the bird" might allow this, because it means
that when in battery, the barrel's little cut isn't pushing the extractor away from the case rim so much.
I actually undercut the extractor gap a bit, maybe creating a 2 or 3 degree angle, working carefully so as not to disturb the actual tip, but only work up to it. This allows the extractor to "bite" a reluctant case and yank it out (like the sharp claw extractors they sell for .22 rifles, designed to overcome iffy extraction of rimfires). BUT, I still want that point to reach deep into the extractor groove and yarn that round outta there with no foolin around.
I agree with Howdy about tolerances. The distance between the bolt face and the extractor pin hole will vary with the rifle, so the extractor gap in Marlin's design needs some tolerance. We can tweak that by bending, either using the method Widder outlines or by bending the middle of the extractor, either way shortening it's reach as needed to achieve a close tolerance fit so the extractor will hold the shell to the bolt nicely.
I also differ in how I do the bolt face. Rather than grinding the entire "teat" below the extractor away, I ground the front part of it at an angle to match the plane of the case head when the case rises to meet the bolt face, but left it full length on the bottom, and about 1/3 of the length at the top, closest to the breech face, so that I still have a litttle case support "shelf" retained, while still allowing a controlled feed. I do this to both bottom "teats" on the bolt, helping the case to stay aligned and not kick sideways at all as it makes it's way to the bolt. It's touchy work, and ya gotta be very sure not to disturb the actual breechface, and to leave a little of the top aspect of both lower 'teats".
But I still use a light extractor spring and a close extractor gap (following Widder's advice), with the mentioned undercut "sharp claw". I will experiment with reducing the forward most part of the extractor "head" so it doesn't push sideways so much when in contact with the notch in the barrel root.
Another experiment I have discussed but got side tracked and haven't yet tried is to create an extractor "guide" out of maybe delrin or nylon (I'd model it with wood), consisting of a dowel the diameter of the extractor bore in the bolt, with a slot machined out of it to accomodate the extractor, and if possible a little "head" left holding the top and bottom bits together, that would end up buried deep in the bore, or failing that simply two halves each drilled to fit the extractor pin... The idea ends up looking like a common "push on" clothespin, cradling the extractor top and bottom. This would allow the extractor to freely slip side to side under spring tension as designed, but would prevent the extractor from floating up and down in the bore, making each extraction action the same as the last, with no more flopping up and down of the extractor (which I think is the real culprit when we get iffy extraction or rounds dropping off. We tune the gap, but the extractor doesn't always end up grabbing the case rim in exactly the 3 O'clock position, etc.)
Appropos of nothing, I an still in awe of the way Widder has managed to bring folks together and revolutionize an 1894 design, making perhaps the most significant changes to it ever made, especially when ya consider he's done it with an eye toward teaching folks how, and any advanced kitchen table gun butcher can learn this.
We gonna have some really slick rifles out there this year