Installing an Improved Marlin Carrier
Howdy Doody
I have had some issues with my Marlin1894cs .357 which I only shoot .38 Special cartridges in, but with assorted brass of all brands. I would get a bad hitch as I was chambering a couple times in a run of 10 rounds. The problem is that the round would not always chamber so I would have to double clutch the lever a time or two to get the round onto the carrier in a position to chamber cleanly.
I checked it out and made sure my magazine tube was clean, mag spring oiled and follower not sticking. I use an aluminum follower. All working good and no problems along the lines of the Marlin jam, which is a feeding from the magazine tube issue that jams a Marlin up. It appears that the problem is in how the round is carried up from the tube to the chamber and it is not squared up to chamber cleanly and is actually cocked.
I ordered the 550-514-561 carrier from Brownells, which is an improved version for the .38spl/.357Marlin. Not the CBC Marlins which are for .38spl only. I would like to see the two compared to see what they look like next to each other, but I do not have one available.
Snakebite bullets is what I will be using for shooting, since they are big lube and all I shoot is true BP, but I had planned on making some dummies up with a few other bullets I have around here too. I have some round-nosed flat point (RNFP) Bear Creek, and some others. Basically the carrier is for .38spl only as in the Marlin competition CBC models. I have heard it cures the issues I was having of having to double clutch every once in a while to get my rounds to chamber fully, as they where on angles going into the chamber and binding. If you saw that video on CAS City, then you saw where I had to double clutch twice in a 10 shot string and that is the rifle I am working on. Yes, that was stage 12 of a two day match and dirt played a part, but it has happened on a fairly clean rifle too. Since I have none of those issues with my 45lc rifle and I get more blowback too, I figured since I have the time now to see what I can do about it.I took comparison pictures so it can be seen what the differences are between “before” and “after”. These are helpful for folks to see the work done.
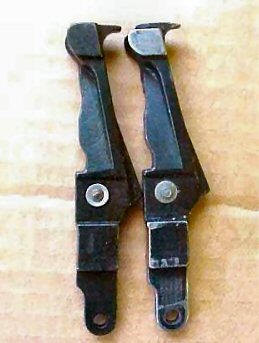
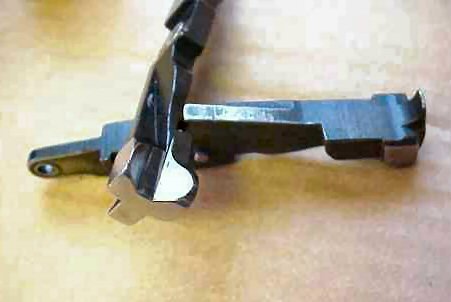
The first picture shows that although the length is the same it has a whole different look to the business end of the carrier. My old carrier on the right is of course polished, but you can see that the surfaces that ride up and down in the receiver are wider and have more bearing surface than the originals. The added surface comes from extending the side bearing surfaces forward. It eliminates the recess you see on the original on the right. The nose on the left is large enough to cover the whole magazine tube,where the original one is not, but it is that curved finger that holds the remaining rounds in the magazine.
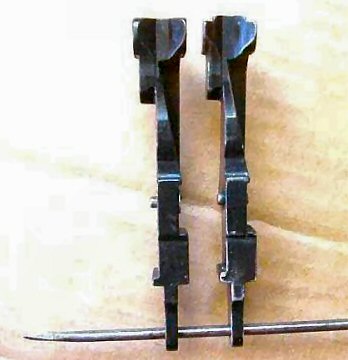
The second picture shows the new carrier on the left and the shape of it is much narrower on the inside and does not allow for so much chance of a round being able to move around and get out of position. The original one on the right is way wider than necessary and would allow a round too much room to move around. There is also more surface contact with the bullet too. That is what I was hoping for right there. If it is on the carrier square right out of the mag tube, then I want it to be the same by the time it travels up to line up with the chamber.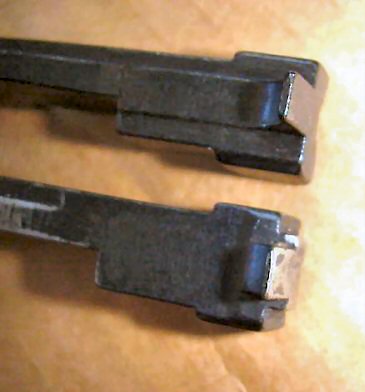
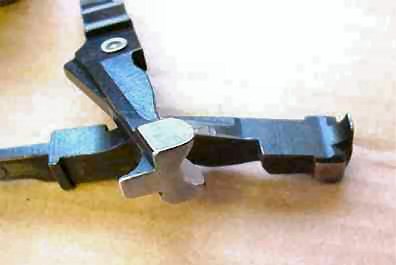
Now this is interesting. Notice that the nose of the carrier on top has the whole danged nose changed. The original one on the bottom has a recess on both sides of the end and here the finger holds the remaining rounds in the mag tube to only allow one at a time to come out. The new one is flush on the end and it may give the carrier more stability to keep it running up and down with no side to side or twisting movement. That would be a good thing. You can see the extra bearing surfaces on the sides as well as the nose.So, this is the starting point to the installation of a new carrier that will hopefully allow for faster cycling without a hitch in the chambering of 38spl rounds of assorted brands and cure the problem I have had. My observation of the carriers reveals to me that they are pretty crudely cast out and machined for something that is so critical to fast feeding, but I guess I can understand that Marlin built them for hunting and not CAS. A hunter isn't interested in cycling the lever at mach 1 and emptying a 10 round magazine into a ground squirrel, but that would be interesting and put a new twist on hunting. Of course if your eating the quarry, you need to watch out not to bite down on a lead bullet.
I should at this point mention that if you don't feel comfortable field stripping a rifle or anything, have a gunsmith (of which I am not one) do the work for you. There are many CAS' smiths that are excellent. You can read this and have an idea what a smith will do for your rifle.
This next procedure is pretty easy and straightforward.
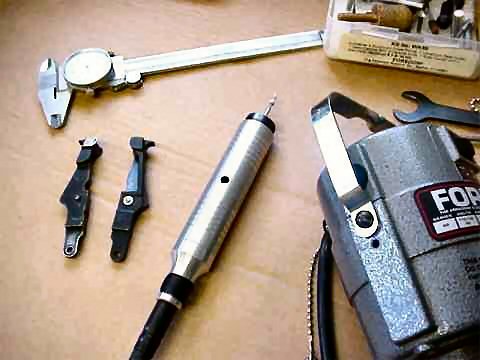
I got out my heavy artillery. I spent the bucks many years ago for a Foredom and a bunch of bits. However, the job of smoothing and polishing can be done with an Arkansas stone, oil and elbow grease. 400 grit emory cloth with oil will work too.
I have a rotary wire brush for my tool and I first took off the paint or whatever that is, off the surfaces to be polished. I did both sides and the front of the carrier nose. There are many imperfections in the casting, but I have no intent of taking metal off, just polishing, so the imperfections will remain. That is what the calipers are for. To make sure I keep my tolerances close. I feel that slop is what was my issue in the first place, but polishing will allow easier action without making the rifle sloppy. Once that coating was off, I chucked up a felt polishing padded bit and added polishing compound and went over the nose and polished it. I also did the rear where the screw holds the carrier in place. I had previously polished the screw, so all should be good at that end.
I also polished the saddle the rounds rest in. Probably not necessary, but it only takes a few minutes with the tool. You can see that the side that fits to the left installed in the rifle, but on the right in the picture is thicker, that is more like to align the rounds for straight on entry to the chamber. That is another thing missing from the original. Maybe this is gonna work pretty well.Next is the checking of the timing of the carrier in relation to height as it drops down below the magazine tube and allows one and only one to come out and then sit properly on the carrier.
Mohave Gambler did a little article on what I did to it about 5 years ago and took some pictures too. Mohave Gambler Article
I have a notion that Marlin did some homework and changed the design of the carrier for the rifles marked CBC due to CAS and the fact that they were for competition and the 1894CS is a rifle that has been around and is for .357 and more along the lines of a rifle for plinking and hunting. No need for things to go fast for those purposes.
All the bullets I seat for dummies for testing in the shop will be seated in the crimp groove too. It is well known that if you are going to shoot .38 spl brass in a.357 Marlin, you need at least 1.5" OAL from bullet tip to case head. We will see about that now with the CBC carrier.
I am doing this because I am a dyed in the wool tinkerer and like things to run all day without a hitch, not because I want to see if a Marlin can outrun and slicked up '73. That might be the basis of things when I get to the short stroking of another Marlin that got from Big 5 for $299 though.
I have seen record runs video of one in action and I would like mine to be able to go that fast too.Continuing along, I need some dummys. I didn't have as many odd bullets as I thought, so I loaded up some of the two I do have and got some not too good looking brass to load them in.
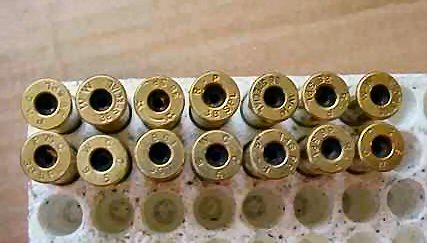
First pic is two Snakebite bullets on the outside of two Double A bullets, taper crimped in the groove and the Snakes measured out to 1.521 OAL and the Double As came out to 1.478 OAL.
Next we have some dummys and assorted brass. One thing noticeable is the difference in case heads and more importantly, the extraction grooves.
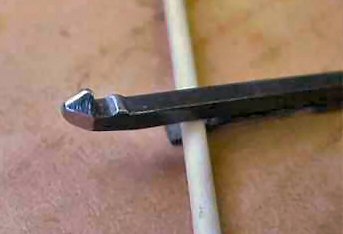
Now this is actually a previous mod, but I took it out to inspect and polish again. The picture is of the extractor, which after driving the pin from the bottom of the bolt comes right out. The Hole in the bolt can be an issue of dirt, although I blow it out with compressed air and it did turnout to be clean, I wanted to look at the tension of the extractor. I took the flat spring and squeezed it with pliers up against the extractor to relieve just a bit of the tension, which would allow the extractor to slide more easily over the round coming up and the bolt going forward to ram the loaded round into the chamber. I don't want the extractor pushing the round off center.You can see (left that compared to a stock extractor I had filed the point that hits the brass to yet another angle and polished it up on the whole nose. That in itself is a source of rounds getting crooked on the carrier, but since I had already done that, no need for much, except inspection. Here's an older article that Mohove Gambler and I wrote up a few years ago to make the Marlin glide with littler effort. Mohave Gambler Article
The extractor needs to end up looking a lot like mine for feeding a variety of used brass though, I can tell you that.
OK! I installed the carrier in the rifle and found that the front of the carrier was too low. This may have to do with the lever actually, because I had done the snail cam mod some years ago, when I found the sharp leading edge of the cam on the lever was making a distinct groove in the bottom of the carrier and a source of problems right there.So,even though this lever mod is another topic of Marlin modification, I took a picture for those that haven't seen it before. The leading edge of what is called the snail cam have been radiused over. That is the edge on top of the picture and left of the screw hole. You can see where it has been polished. That snail pushes up on the bottom of the carrier when cycling.
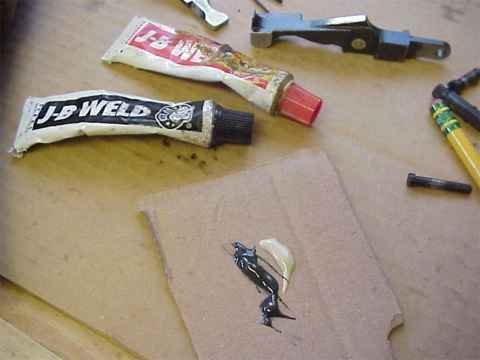
So now how to raise the carrier remembering that metal from the sharp edge of the lever cam has been removed previously. I suppose a wire feed weld could build up a surface raising the carrier, but I came up with this using JB Weld to add a shim to the carrier.
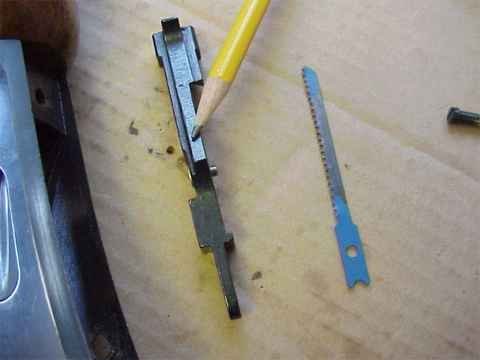
I took an old jig saw blade to use for my shim. I also propped a pencil to point at the spot that the line would form on unmodified Marlins from the leading edge of the lever snail cam. That is also where I need to build up more height.
First off, I filed off the teeth from the blade and made it flat. The width is going to be just about right. To cut the piece of blade, which is pretty hard, I filed the pointed end flat and then with a triangle file made a deep notch and was able to just snap of the length I needed.
I mixed up some JB Weld a good mechanics friend. After cleaning the surface with my wire wheel attached to my rotary tool on the carrier to prep for adding the shim, I attached the shim and let it set overnight to see if it was going to hold well.
I then applied the JB Weld and took some pics for you to see.
Side view - after "welding" and before finishing.
After finding that JB Weld did a good job of attaching the shim to the carrier, I got my grinder going and squared off the edge and tapered the other down. It is pretty much finished, but the actually thickness has yet to be determined on what will do the trick.I will have to install the carrier in the rifle, put the floor plate back on and install the lever and see how much I will need to take off the shim, since it is thicker at this point than what I will need. I will be able to take the shim down with a flat file. This is my finished shim. There is also another angle to see the lever that has had the edge radiused too.It took three installs and removal of the carrier to file down the shim I added a little at a time, to get the height that would work the best for my rifle. I cycled the 10 dummy rounds each time and I am satisfied with what I have now and I can cycle it without a hitch as fast as I can work the lever. It is working great. Great, so long as you do it with the rifle upright and in the level shooting position. Marlins hate to work if you cycle them sideways or tilted. I had a tough time taking pictures to explain where I finished up with the height. No exact measurements taken. It is more like a careful eye, seat of the pants thing. I think exact measurements would not work for all Marlins, since there is a bit of slop built in right out of the box.
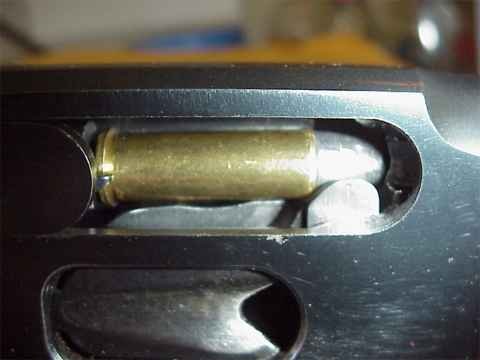
Here is a picture of a dummy on the carrier just before the bullet is going to enter the chamber
The dummy round is now entering the chamber and in this position it now feeds very cleanly.
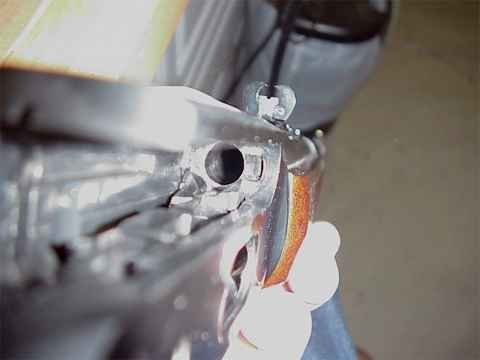
Trying to give a look at the carrier in the up most position and where the rounds were feeding the very best. With the shim it was higher yet until I thinned the shim with a flat file.
Another look at the height
Here is the best I could do for a picture of the carrier holding back the rounds in the mag tube. By raising the carrier I wanted to be sure that the new carrier did the job of not allowing two to get into the receiver at once or for sure I would have created the Marlin jam. All is well and I like the new nose of the new style carrier a lot. Polishing the entire nose allows it to glide over the case heads too, compared to that rough coated surface it comes with.So, final assembly included a dab of loctite on the screws and trying the dummy rounds a couple more times. Next step is trying it at the range. I think I helped the old rifle out and so no more double clutching when chambering. I hope this has helped at least someone see what the new carrier looks like and does, and how it can be set up to run well.
yer pard,
Howdy Doody
Notorious BP shooter