Winchester Improved Henry (Model 1866)
and Model 73 Lever Rifle and Carbine
Disassembly/Re-assembly Instructions
Lets get the safety issue out of the way. Make absolutely sure the gun is unloaded, both the chamber and magazine before proceeding with the disassembly.
Before I tell you what you need to know about tearing apart your favorite 1866 or 1873 rifle or carbine there are some items that I want to get out of the way so we are all on the same page.
1) I am a shooter who has taken the time and effort to know how my guns work. I am not a certified gunsmith. These are basic instructions for taking apart the rifle for general cleaning. If you are not comfortable working on your guns, please CONTACT A GUNSMITH.2) Get a set of high quality gunsmith’s screwdrivers before you disassemble anything. They will make your life much more pleasant because you are less likely to strip a screw and put a gouge across the finish of your firearm, or your hide.
3) Work in a place that has good lighting with few shadows. Keep a small flashlight handy for those hidden areas that need a little extra light.
4) Remove distractions, pets, kids, spouse, etc. from work area. Trust me there are few things more irritating than having your dog jump on you just as you take the lid off the Hoppes, or your loving spouse interrupting you in the middle of a critical step.
5) Make sure your work surface is solid with plenty of area to set aside parts, tools and other materials.
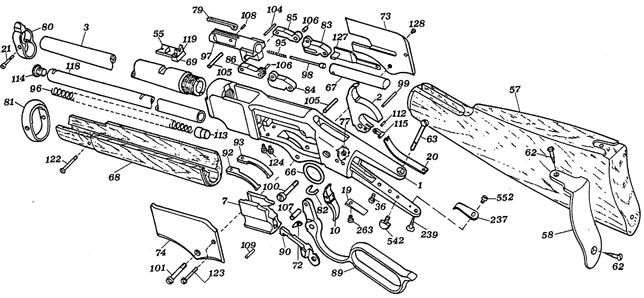
Relax, this isn’t difficult, it’s a learning experience. First, read all the instructions through to the end. Also study the parts diagram below. You will save your self more than a few headaches if you read this whole document before you begin work.
Set the Model 66 rifle on the table with the barrel to the left and the lever toward you, loosen (but do not remove) the two lever spring screws. The top screw is for the RIGHT lever spring (92) and the lower one is for the LEFT Lever spring (93). (The parts charts refer to the screws as Left and Right - when you have the gun upside down, as you look at the screw-heads) The spring by the loading port (left) sets the tension needed for proper timing of the loading block.(Note: This step is not needed for merely removing the side plates for cleaning the 73. It is needed to fully dissemble the 73.)
Note: If this is the FIRST Time you take the gun apart, the spring tension screws can
be VERY Tight. If so, try this alternate method:
Take off the side plates first. The side plates are removed by taking out the
lever screw and then sliding the plates down. They are dovetailed in place and
slide to the bottom to remove.
Now, pull the lever springs out to the side. This relieves the tension on the
screws and you can get them out without bunging them up. DO NOT do this on a
regular basis because the stress of the strong levers make removal of the lever
screw bind and eventually strip the right side plate. Proper (lighter) springs
should make this not needed in the future.
This applies to the Model 73 as well.
A word of warning - the side plate edges on a 66 are VERY sharp!
For the Model 73, Start here. N
Remove the screw that holds the site plates. You can use the screw to help
lift the left plate and then you can use your finger to "punch out" the right
plate. Then, use a screw driver to lift each of the two springs (lever spring
and elevator spring) to remove tention from these screw to help aid their
removel. - For a 73 Parts Diagram
On the 66, unscrew the side plate screw (123) and the lever screw (101).
Use screw drivers that properly fit the screws - they are relatively soft and
VERY easily messed up.
Note. The model 73 does not need the lever screw removed unless you need
to remove the lever or fully disemble the 73. So you may want to only unscrew
the side plate screw (123)
To remove the left (top) side plate after removing the two screws, you may have to use the side plate screw. Put the screw into the hole just enough to let the threads grip the edge. Hold the screw at an angle and use it as a lever to raise the back of the side plate.
With the side plate off, study the linkage. Notice that the left link assembly has the thinner portion towards the barrel and is held by three pins - one on each end and one in the middle. You won't be able to see the Lever Pin (107) that holds the lever to the linkages - and cycles the linkages (and therefore the breech block or bolt). The bolt then cocks the hammer.
Remove the (left) link assembly. The lever pin may stay in the right linkage, stay with the right linkage, or fall out.
Now you may remove the lever. (For the Model 73, you do NOT need to remove the lever for simple cleaning)
To remove the lever of the model 73, you will need to use a screwdriver or lever
to lift the lever springs (92 & 93) off the lever and Lifter Arm to release the
tension on them. Unless you need to remove the springs, it is best not to
loosen the screws so that you will not have to re-adjust the spring lever
tension when you reassemble.
The right side plate may simply fall onto the table. Or you may have to lightly tap on the rear of it to release it from the frame. Be careful to watch if the right linkage and lever pin falls onto the table.
Turn over the rifle and, if the right linkage assembly hasn't fallen out, gently remove it. You may have to use a srewdriver or plyers to grab the assembly and remove it.
Look at how the Lifter Arm (90) goes into the Carrier Block (7) and raises and lowers it. You must cock the hammer and pull back the bolt to free up the Carrier Block. Now, remove the lever screw and remove the lever. The lever screw also holds the lifter arm.
Raise the Carrier Block (7) enough so you may remove the Lifter Arm from the Carrier and set it to the side. You will want to clean it and later lubricate it. (I use a thin gun grease.) You will also want to clean the frame where the Carrier Block rides. The carrier block should drop out of the bottom of the receiver after the lifter arm is removed.
While you have the gun apart, you may want to polish the Carrier Block using Emory Cloth or a metal polish. You may also polish the surface where the lever rides on the frame and the Lifter Arm (90).
To lighten the action, you may remove the two lever springs and put a small, thin washer under each lever spring. Or better yet, have the springs ground and reduced or buy a lightened spring such as SliXprings. Long Hunter or Pioneer Gun Works or Whisper Springs The lever spring on the side of the loading gate is very important for proper timing of the Carrier Block. If that spring is adjusted too light, the Lifter Arm will not work properly and the action will not cycle properly.
To slightly reduce the trigger pull on the Model 66, you can also remove the trigger spring (19) and place a thin washer under it as well.
To help load the rifle easier, look at the Ladle (127). This is the piece that you push in every time you load a round into the magazine. The back, thinner portion of this piece (which has the screw hole on the end) acts as a flat spring that resists the loading and KEEPS the cartridges in the magazine. You can thin this flat spring to make the gun much easier to load. Of course you do not want to overdo his or the cartridges won't stay in the chamber and the gun will jamb! So I thin it so that I leave the spring at about 3/4 of it's original width. That little bit really helped mine.
The newer ladles on the model 66 are too weak in the cartridge stop area.
To avoid their breaking and jamming the gun, so what Will Shootem (a good
gunsmith) recommends:
"I use J B Weld to support that tab on every 66 I do an action job to, and it
hasn't failed yet. It's important to rough up the surfaces that the
J B Weld will adhere to, and clean them with a degreaser before applying the J
B Weld. Let it dry for 24 hours, and file to the proper shape if needed. "
Put some Blue (removable) Loctite or clear finger nail polish on the Ladle Screw (128) so that it won't come loose - Hopefully. Since the ladle is thin, you must be careful so that you don't strip the threads by over-tightening the ladle screw. Remember - use a REMOVABLE screw tightener.
Magazine Spring Removal and Cleaning.
Some rifles have a cap that is actually a large screw. There is a long, thin slot in the top. It is very important to use the proper screw drive or you may damage the cap. One suggestion is to use a hack saw blade cut to the same length as the groove. Or use good quality gunsmith screwdriver with the proper fit. The first time you remove this, it can be tight.
If it is quite tight, you may need to use an impact driver. In that case, be sure to properly support the magazine tube in a padded vice. Be sure to put the tube in the vice rather than the barrel or gun. If the tube is not supported, you may turn the tube into the retaining pins and that can dimple it enough so that the follower won't clear. If it's a carbine it could hang the follower in the tube and you won't be able to load more than 4 or 5 rounds.
For other models, the cap may be held in with a screw that goes through the side of the magazine tube and into the cap.
In some carbines, you may also need to remove the barrel band to get the spring out – but not always.
If it is rusty, you may want to replace the spring (I recommend the stainless steel spring by Pioneer Gunworks or Cowboys and Indian Store .) Lubricate the magazine cap and reinstall.
Remove Breech Block
After the links are removed, you may begin to take out the breech block.
First, take out the firing pin extention (the "the bolt that cocks the hammer).
They are connected in two possible ways.
- The first is a small pin holds the two together. Drive out that pin and the
firing pin extension can be removed. Then the firing pin (and spring) may be
removed - or they may just fall out.
- The second method (in really old rifles OR in the newest models) uses the forward pin that holds the links. In this model, the pin is removable, just slide it out. Then there is an odd shaped piece that slides up into the breech block that holds in the firing pin extension. Then you may remove the firing pin extension, firing pin and spring.
For a 66 you may then remove the breech block.
For a 73, you must first remove a small screw in the top of the dust cover. Then
carefully slide the dust cover back a little and remove the Dust Cover Guide by
sliding it forward (towards the barrel.) (Be careful, there is a small ball
and under spring tention under that screw so if you move the dust cover back
too far, it will come flying out. It is easy to resinatll - AFTER you find
it.)
Once the dust cover guide is removed, you may then remove the breech block. In
some rifles, you may have to remove the lever first.
Reassembly
You may want to rub the edges of the side plates against a screw-driver shaft or possibly a fine stone to take the sharp edge off. Also take the sharp edge off the inside of the loading area on the right side plate.
Replace the Carrier Block. Then insert the Lifter Arm.
Replace the Right Linkage Assembly. (I lubricate it with thin gun grease) Put the lever back in, then install the lever pin. Be sure that the lever spring is riding on the lever. You may need to put the Lever Screw part way in to hold everything together. Later you can remove the Lever Screw so you can replace the left Side plate.
Replace the right side plate so it will hold the linkage in.
Turn the gun so that the left side is facing you. Install the Left Linkage Assembly. BE SURE the Lever Spring is riding on the Lifter Arm. Slightly tighten the lever spring screw to keep it properly aligned.
Replace the left Side Plate and install the Lever Screw and Side plate screw.
Tighten the screws - for both lever springs, the lever and the side plates.
Put a drop of oil on the bolt and on the hammer where the bolt contacts it.
Cycle the action to see that it all works well.
To advice me of any needed corrections please email me at marauder13056@yahoo.com