Slicking up a Winchester 97 - A Few Hints
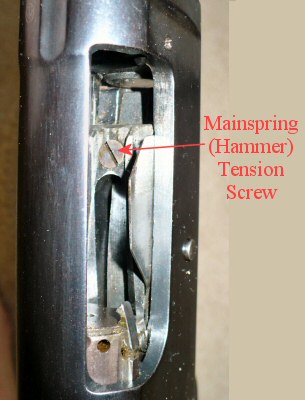
Written by Marauder SASS #13056Many folks asked about slicking up the Winchester 97 and the modern made clones. First, the bad news. These were complicated, handmade guns with each one varying a little bit. As such, it is very difficult to give specific instructions for slicking them up very well. That is especially true for me since I'm not a gunsmith. I'm only a person with a hobby and a little mechanical knowledge. The good news is that there is some simple things most of us can do that will significantly smooth the action AND prolong the life of the gun. But the standard warnings apply. If you are not familiar with working with guns or fine metal work, tis best to leave such work to a gunsmith that is experienced with the Model 97 - not all are, so check around. Summary One thing you can to to increase the life of the gun is to shoot only light target or softer ammo. Lightening the hammer spring will significantly lengthen the life of a 97 as well as making the action much smoother. Instant Action Job (For an "instant" action job, open the action, with a medium sized screw driver, reach through the "ejecting" port and loosen the hammer spring screw (Mainspring Tension Screw Part #75) until the hammer is much lighter. Don't loosen it so far that the screw is above the carrier surface OR the screw is at all loose. This only helps so much, but it does help. Depending on the gun, you may need to use blue locktite, nail polish or similar to held the screw solid.) The Process A note on polishing. Take a good look at the Disassembly Instructions You will need to refer to them and the parts diagrams often. (These instructions do not cover the ejection of shells since tuning the left and right ejectors is kind of an art. An art that I have not perfected. Sorry 'bout that.) But many have merely replaced the parts and they have worked well for them. It hasn't always worked for me...  This is a primary source of drag in the action and the strong spring increases wear throughout the action.
Click on picture at the right for a larger view.
Then you are done and ready to shoot.
When I say "polish" I mean that you do not want to remove any more metal than absolutely needed. You may still have some "texture" to the surface, but as long as it is relatively smooth with no real rough edges, the action will work much better. To "polish" I normally use either a polishing wheel or emery paper. Once in a while I may use 600 grit sand paper and rub fairly lightly. Removing too much metal merely wears out the gun and may result in an inoperable gun.
Be sure to leave some extra tension. The tension can be adjusted lighter by loosening the spring tension screw a turn or two. (The tension screw is accessible by opening the action and using a screwdriver though the loading port.)
First, look at the end of the arm. This is where the action arm fits into the Action Slide Hook. Fit the action slide hook to the end of the action arm and see whow well they mate up. There should be less than 10 thousands separation. A occasional problem is for the action arm to leave too much space. This leads to excessive wear that will eventually let the arm slide slip out of the action hook. Then the action will actually come out of the action. The only way to resolve this is to have the end of the action arm welded up a little, then file to fit it properly to the hook.
The second area to examine is the "diamond" that fits into the carrier. Make sure it is a nice symetrical diamond that fits pretty well into the carrier. I've seen a few where the angle was wrong - thus causing excessive wear on the front of the carrier. This is critical because that space on the carrier is so thin anyway. Again, IF that is a problem, the only solution is to build it up by welding, then fit it by hand.
If you see any deep scratches caused by rough spots on the inside of the actionslide, polish off those rough spots. Slightly polish the top and bottom of the action slide where it rubs against the frame.
Screw in the screw until the trigger will not release the hammer. Then unscrew until the hammer falls.
Then hold the trigger back and let the hammer fall, continue to hold the trigger
back and slowly cock the hammer. IF you feel the trigger catching on any surface, slightly unscrew the trigger stop and try again. Sometimes the trigger
will be rubbing against the hammer and cause wear or misfires.
Many shooters find that a slightly shorter stock helps them to load effectively. A general recommendation is a 12.5 inch length of pull (of course the stock would be less than that). But this would vary by shooter. I have short arms so I cut mine to 12 inches. The LOP is not exactly proper for shooting, but works much better for me when loading.