Making a Widdermatic Marlin
By Widowmaker Hill SASS #59054Marauder's Notes:
Widowmaker Hill has given us some very good information to help improve the reliability as well as the spped of the Marlin 94 rifles. But . .WARNING: This information contains some significant modifications to the gun parts.
The work is generally not reversible without replacing parts of having someone do welding and machining. So you may want to give this information to your gunsmith unless you are pretty handy and don't mind a little risk.- - - Now we return you to Widder's instructions. . .
First and foremost, if you have a good, reliable Marlin that
has no problems, I wouldn't consider this modification necessary.
- - - - You can find more great info on the Marlin by knowledgeable Pards can be
found on Marauders website:
http://marauder.homestead.com/rifles.html. There you will find parts diagrams as well as take-down instructions.
Tools:
Although I used my dremel drill and light sandpaper, all of this
mod can be accomplished with a good file, a couple stones and fine grit (600)
sandpaper.
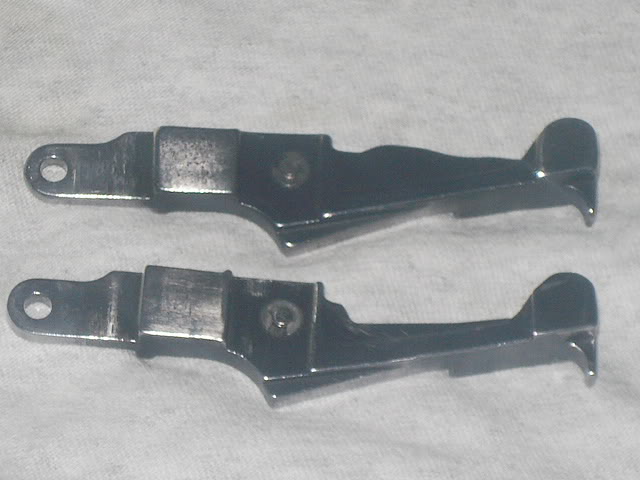
Photo #1 - original carrier (top) and the cutdown/angled carrier (bottom). Please notice that the plunger retaining 'washer' has been replaced by a small 'e-clip'.
If you'll look at Photo #1, you'll see that these carriers have a 'step down'
area that seemingly facilitates a stopping point of the cartridge on the
carrier as it comes from the magazine (top carrier).
The stock carrier also has a "hump" on the ramp portion of the carrier
If you'll notice where I cut my carrier (bottom carrier) you will see that I basically made my cutdown that just looks like another 'step down' of identical demensions. Then notice that I also angled my cut a little back. This helps when the cartridge rim is angled up and begins to engage the face of the bolt. Its not necessary to angle that cut but in my Marlin, I noticed that it helped ' smooth the feeding process.
Another thing is that my angled cut is from the BACK (or rearward) part of the wings. Actually, I probably started my angling just a couple thousands into the wing area. I haven't experimented with cutting the angle beginning at the front of the carrier so I can't recommend it. Start your angled cut at the rear of the wings. You will be removing the "hump" and slighly change the angle of the ramp.
Measurements for the Carrier Cut here are some measurements and other general info on the carrier cut.
From the front part of the carrier, I did my cut approx 1.45" back. In looking
at your carrier, this is the very location where the 'hump' in the carrier
rolls back down to meet the 'flat spot' right in front of the cartridge stop.
Then I made my cut approx .115" deep. In looking at my photo, you'll notice that its nearly an identical stepdown as the cartridge stop appears on an unmodified carrier. In other words, instead on 1 step down (which is the original cartridge stop area) you will now have basically identical stepdowns with your modified carrier.
Now, with a sharp object, scratch a straight line from the rear portion of your
wings to the bottom of your cut. This is the part of the carrier that will be
taken out.
HINT: the line you scratch should be approx .115" above that 'edge' that Marlin has
built into their carrier body.
As for the slight angling back of the new cartridge stop which you have just cut into the carrier, do this process slightly. The purpose of angling this cartridge stop is to help facilitate the rim of the cartridge on the carrier to guide it a little smoother under the extractor when the bolt face contacts the cartridge rim.
If you've noticed, the figures of .115 play significant roles in modifying this carrier for the .38 special.
DO NOT use these figures should you try to modify the carrier for larger caliber ammo.
In my discoveries so far with the Cowboy 45 Special, the cut down will be
deeper, placed at another location on the carrier AND will actually angle into
the wing area approx half way.

Photo #2 - Front of bolt. Note that the tip on the bolt face directly below the
extractor has been removed.
Note the removal of that 'tip' on the bolt face below the extractor and it helps the reliability if the other two tips on the bolt are shorted a tad and smoothed on top. DO NOT REMOVE THOSE OTHER TWO TIPS!
Be VERY CAREFUL when smoothing those other two tips. (See write up below)
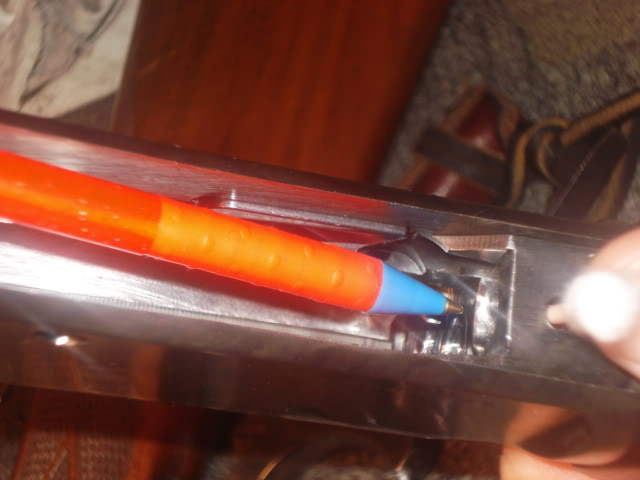
Photo #3 - Chamfered area on the upper end portion of the magazine feed area.
This is an important task that nearly everyone can do. You very slightly round the top edge of the entrance into the frame of the
gun. This prevents the cartridge from catching on a sharp or square edge.
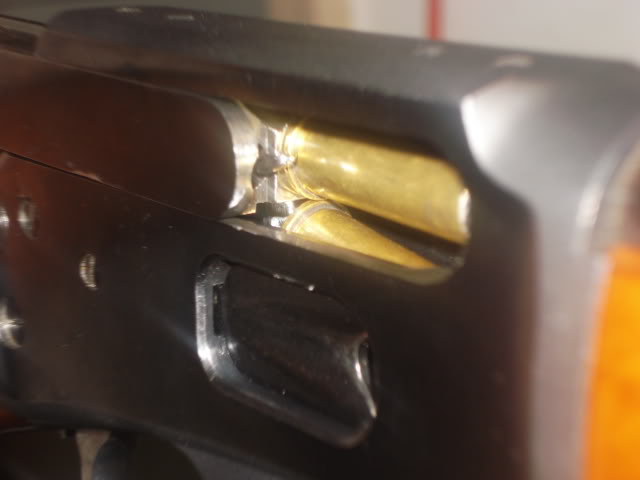
Photo #4 - straight feed characteristic of the standard (unmodified)
carrier.
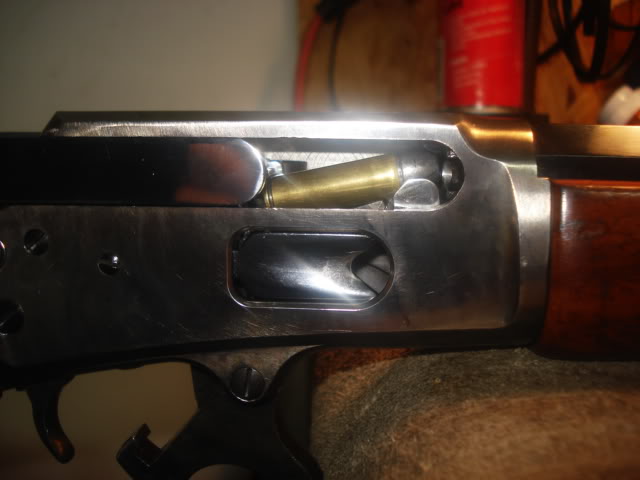
Photo #5 - cartridge feed angle from the modified carrier.
You can see why I also polished the upper part to the entrance of the chamber, but only a tad. This has helped smooth up the feeding 'feel', or lack thereof. Its smooooooooth!
Photo #6 - blurry pix of extracted case and the next round on
the modified carrier. Note the increased space distance between the case
being extracted and the next cartridge on the carrier.
NOTE: My using the reference names of Lassiter, Deuce and
Curly Bill Kelly is not to imply their endorsement of this setup. It is being
used solely to show proper gratitude as used in my referencing their names.
Thanks to Lassiter for giving me one of the 'critical' pieces of advice that
helped in accomplishing this setup.
Thanks to Deuce for running 10 super fast rounds thru it at Guns of August this year. From port arms with a 2 plate progressive sweep, the first 10 shots
that Deuce ever fired from this rifle was timed at 2.73 seconds. No jams,
glitches or rolloffs. My guess is that if ya gave Deuce a little time to warm
up to this setup, he
could run a shoulder start with 10 rounds in sub 2.
Thanks to Curly Bill Kelly for using this information to enhance 2 other
Marlins and make a couple of 'paper weights' into some fine shooting Marlins
with happy owners.
The mods that make up the Widdermaticis one of those 'shot in the dark'
experiments that turned out well. The basic idea was conceived in a
conversation I was having
with Lassiter about the Marlin.
The interesting thing about this setup: IT IS NOT A SHORT STROKE! The lever
travel distance is not
affected. This setup is a reliability mod that allows the shooter to run full
bore without having concerns about 'roll-offs', cartridge jam-ups in
extraction/feeding, and it eliminates your fears about the Marlin Jam. Plus, it
virtually eliminates problems in OAL of cartridges and bullet weight/designs.
Now for the Bread and Butter stuff:
Marlins are made to feed straight into the chamber from the carrier (Photo #4).
This process requires that the extractor 'snap' over the rim of the cartridge.
In the Widdermatic, the carrier has been cut and angled down which creates an
angled type feed from the carrier into the
chamber. When the bolt moves forward and contacts the upper portion of the
cartridge rim, the carrier is holding it in an angled position. In essence, the
cartridge is pushed up and forward into the chamber and the rim 'slides' under
the extractor (Photo #5). This can only be facilitated with the removal of that
'tip' on the bolt face below the extractor and it helps the reliability if the
other two tips on the bolt are shorted a tad and smoothed on top (Photo #2). DO NOT REMOVE THOSE OTHER TWO TIPS!
Be VERY
CAREFUL when smoothing those other two tips. My suggestion is just to check the functioning of your rifle and if necessary,
just smooth the tops of those tips. You MUST have enough of those tips to help
hold the case tight when the extractor is pushing against the case rim from the
other side of the bolt.)
Once you remove the tip on the bolt face, the only thing holding your cartridge
on that side of the bolt is your extractor.
If your extractor is weak and/or the tip is worn, you might experience some
looseness of the case being held during extraction. Install a new extractor.
And, like most of our rifles, you might have to tune that extractor a little. I
had to work with mine just a little but I was doing abunch of stuff at the same
time and that was just something I worked on.
If your Marlin is giving you that 'weird feeling' when your carrier is starting to rise with a fresh round, you might just want to do the 'chamfer' job at the end of the magazine tube first and see if this helps. You be surprised at the good results you get from this minor procedure.
If you notice on a standard Marlin, when an extraction occurs, the extracted
case and the case on the carrier nearly touch at the rim area (Photo #4).
Working the action fast can sometimes 'bounce' the round on the carrier and
cause it to interfere with the clean ejection of the previous extracted round.
In the Widdermatic, notice in Photo # 5 that the extracted round and the round
on the carrier do not come close.
Also, in a standard Marlin, the round being fed into the chamber is at one
point, totally visible in view of the ejection port. This explains possibility
of a
roll-off - and increases if the gun is not cycled with the gun held verticle.
But in the Widdermatic, notice that the round is never fully visible from the
port. Either the rim is still below the port area
OR as the rim is coming up, it is being 'captured' by the extractor at the same
time that the nose of the bullet is entering the chamber. If you want to
virtually eliminate roll off problems, this sure helps.
I also polished the upper part to the entrance of the chamber, but only a
tad. This has helped smooth up the feeding 'feel', or lack thereof. Its
smooooooooth!
Now for Photo #3 and my personal view of the Marlin Jam.
- More complete info concerning the Marlin jam is also covered
very well in Marauders website)
When a round comes on the carrier, the next round in the magazine tube nudges
itself into the 'next round' position. When the carrier rises, the end of the
carrier makes contact with that 'next round' and gently nudges it back into the
magazine tube ever so slightly. Its hardly noticeable
unless your looking for this.
Anyhow, there are times when that 'next round' will protrude that couple extra
1000's of an inch and its rim gets caught on the upper portion of the area
which it came out of. What's happening is that the carrier is trying to come up
and at the same time, it has managed to press the protruding rim of the 'next
round' on that upper portion of steel. The more you force the lever closed, the
tighter things become.
THE CURE: Chamfer the upper portion of that hole. The amount of chamfer
required is only the amount that eliminated that edge where a rim could be
snagged.
Want to know another goody on this setup: Overall cartridge length becomes way
less critical and bullet styles and weight also become less critical.
"Trigger Bite"
I tried two very successful ways to eliminate that 'trigger bite' in the Marlin.
Curly Bill Kelly performed a little 'weld' job on my original trigger that set
it back without the flop. BUT, more convenient was when I bought me a "Trigger Happy". I got my first one from AJ but since he doesn't sell them anymore, I bought
my others from Brownells. "Trigger Happy"
When you get it, be sure to round off that bottom portion of the trigger and
smooth it up a little. This should solve your problems with the trigger bite.
Now that you've read this, take a look at a video I made to help explain and
demonstrate the Widdermatic.
Widdermatic Video
Well, My fingers are tired and I'm heading out the
door to go home. Catch you fellers later.
..........Widder
Tuning the Marlin Extractor
Return to the Rifles Page
Return to the Old Iron's Page