Disassembly/Reassembly
of Winchester® 1873 Replica Rifles
By Manatee and Marauder
Manatee's Page
Warning and Disclaimer!
ALWAYS wear high-quality safety eyeglasses when installing or fitting any parts, particularly springs, to prevent injury. Always wear eye and ear protection while shooting. Never discharge a weapon in an unsafe manner or direction.
DO NOT use ammunition exceeding manufacturer's recommended specifications or pressures suitable to your firearm.
The use of an aftermarket product in your firearm, such as this carrier block, may limit or void the manufacturer's warranty.
In all circumstances, ensure the firearm is unloaded before attempting any of the following procedures. Check and recheck the magazine and action to ensure no cartridges remain in the rifle. It is a good practice not to have ammunition in the same room as the firearm you are cleaning, repairing, adjusting or dry firing.
Failure to follow strict safety practices in the assembly, test and/or operation of your firearm may result in accidental discharge, firearm damage, serious bodily injury and/or death. ALWAYS be certain that the firearm is functioning properly before use.
These procedures assume that the user has basic mechanical comprehension and skills. If you are in any doubt as to: 1) your abilities, 2) the steps to be followed, or 3) the safety or function of the firearm during or after installation or during testing and use, DO NOT PROCEED with further assembly, disassembly or use. STOP! Take the firearm to a qualified gunsmith for inspection.
We make no claim as to the completeness of these procedures, their accuracy or their suitability for your particular firearm or your intended use of said firearm.
Note: This
document relies heavily on the following, so you may want to look it
over first.
http://marauder.homestead.com/files/Model66.html
These
instructions are for an Uberti® 1873 Winchester® replica rifle.
While the procedures are similar to an 1866 Winchester, please follow
Marauder's guide for steps particular to an 1866. The
instructions are also helpful in replacing the carrier, if you choose.
Lastly, use a high quality gunsmith's screwdriver with a bit designed for the specific screw.
Let's get started.
For the 73 Carbine Parts Diagram
Option2. Use for when screws are very tight. Take off the Side plate - see below. Then use a screw driver or lever to lift the lever springs up and away from the inside to releave tension. Then you may loosen the screws if needed.

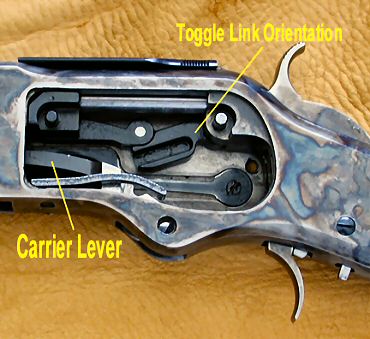
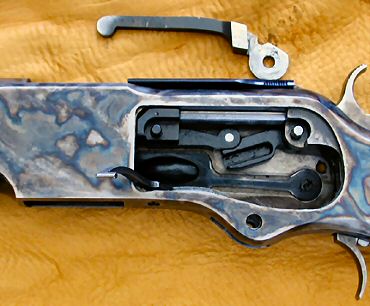
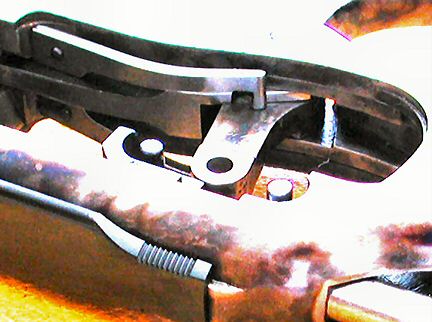
Please note the orientation of the right toggle link in this photo. The channel cut in the toggle link is always attached to the rear pivot pin.
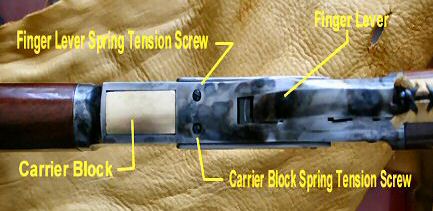
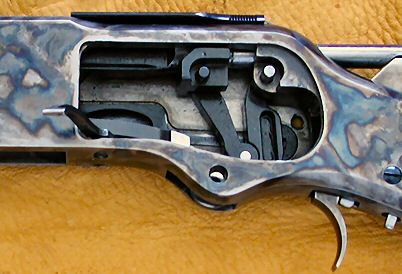
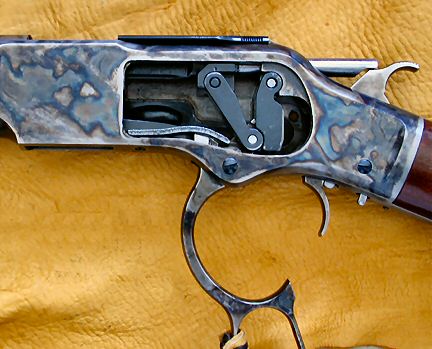
The carrier lever may be removed by lifting and sliding it rearward. The hammer may have to be cocked, the bolt moved rearward and the carrier block moved vertically to "joggle" the lever out of its position in the carrier block. Now is a good time to familiarize yourself with the position of the carrier lever within the carrier block.
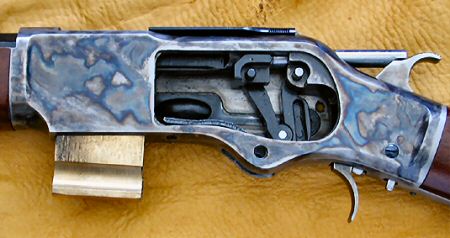
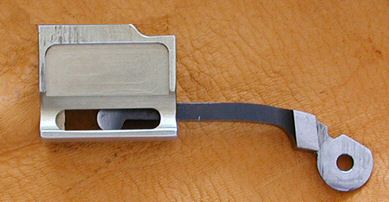
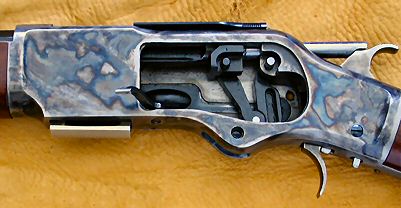
Insert the Carrier Block and test fit. The carrier
should move freely to the top of its normal cartridge eject position.
As noted above, the dust cover latch may hamper vertical movement
beyond
its normal operating range.
Uberti carrier frame channels vary by a few thousandths of an inch, particularly in older firearms. If a replacement carrier block does not properly fit, slightly smaller dimensional changes may be required. Contact your supplier when in doubt.
Magazine Spring Replacement.
Install the magazine spring in the magazine by removing the magazine cap.
Some rifles have a cap that is actually a large screw. There is a long, thin slot in the top. It is very important to use the proper screw drive or you may damage the cap. One suggestion is to use a hack saw blade cut to the same length as the groove. Or use good quality gunsmith screwdriver with the proper fit. The first time you remove this, it can be tight.
If it is quite tight, you may need to use an impact driver. In that case, be sure to properly support the Magazine tube in a padded vice. Be sure to put the tube in the vice rather than the barrel or gun. If the tube is not supported, you may turn the tube into the retaining pins and that can dimple it enough so that the follower won't clear. If it's a carbine it could hang the follower in the tube and you won't be able to load more than 4 or 5 rounds.
For other models, the cap may be held in with a screw that goes through the side of the magazine tube and into the cap.
In some carbines, you may also need to remove the barrel band to get the spring out – but not always.
Replace the spring (I recommend the stainless steel spring by T.G. Reaper or an OEM spring). Lubricate the magazine cap and reinstall.
As a final test and inspection before firing, cycle the finger lever to check the travel of the carrier block in the assembled rifle. Tighten the side plate and lever screws to "snug". Do not over tighten. Cycle the finger lever a few times to ensure proper operation. Any interference problems MUST be resolved prior to live fire.
At the range, insert one round into the magazine and cycle the action through firing, while pointing the firearm in a safe direction. Stop and resolve any interference or functional issues. Multiple round tests should then be conducted to ensure proper functioning.
© 2004 Banana River Outfitters